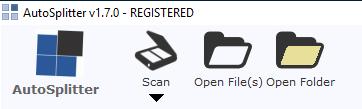
 AutoSplitter
Scan multiple photos at once and crop them automatically
 Download AutoSplitter now!
Search site:
Select a tutorial page:
Tips on successful batch scanning How to add a new split quickly Introduction to AutoSplitter Rotate output images with 1 click
Select scanner or resolution
Finetune photo detection
Error during scan or file load
Select output file format
Open multiple scanned files at once
Photo scanning guide
Scanning guide: autodetect
Scanning guide: manual
Scanning guide: reuse cropping areas
Metadata saving
Open multiple scanned files at once
 Submit a support ticket in case you need technical assistance.
 DOWNLOAD Scanned Image Extractor application
Open files
 Autosplitter offers scanned image extractor feature for people who have already scanned a lot of photos and saved them into files.
You can open multiple files or a whole folder of pre-scanned images for autodetection.
Autosplitter offers scanned image extractor feature for people who have already scanned a lot of photos and saved them into files.
You can open multiple files or a whole folder of pre-scanned images for autodetection.Please select output folder and file format before launching this feature. Click "Open Files(s)" and select multiple files by holding ctrl or shift. If you have a whole folder full of pre-scanned images, use the "Open Folder" button and find the location. Starting from v1.12, you can open multipage TIF files - they will be handled as if you have opened multiple files at once.
WARNING! Files in the output folder will be overwritten without warning or confirmation in case of a filename conflict!
Batch detection
 AutoSplitter will open each file and find and save the individual photos to the target folder. This may
take a lot of time if you have large amounts of photos.
AutoSplitter will open each file and find and save the individual photos to the target folder. This may
take a lot of time if you have large amounts of photos.Photos detected will be saved to disc (in the output folder) immediately. Of course, the detection might be inaccurate therefore you'll have the chance to review and change the results in the following steps.
Batch review
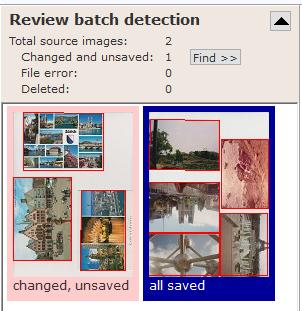 After batch detection has been completed, a new panel will open on the left side of the user interface.
This panel shows thumbnails of all processed images with the detected photos framed in red. Scroll this area with your mousewheel or click into the image list and use cursor keys and page up/down
to navigate. If an image needs manual adjustment (misdetection for example) press enter to open the selected image. Doubleclick on a thumbnail will also open the image for editing.
After batch detection has been completed, a new panel will open on the left side of the user interface.
This panel shows thumbnails of all processed images with the detected photos framed in red. Scroll this area with your mousewheel or click into the image list and use cursor keys and page up/down
to navigate. If an image needs manual adjustment (misdetection for example) press enter to open the selected image. Doubleclick on a thumbnail will also open the image for editing.
What the status text below the thumbnails mean:
all saved: all splits (framed with red) saved to disc as shown in the thumbnail.
changed, unsaved: one or more splits have been adjusted but the change has not been saved. If you exit the batch review before saving these splits, your changes will be lost.
deleted: all splits of this image have been exluded.
file error: file cannot not be opened. Might damaged, missing, extension does not match format, out of memory error during load, etc.
If there are any changed files, you will see a "Find >>" button at the top of the review panel. This button will jump to the first changed, but unsaved image to let you find and save the photos quickly. Click the black arrow shown in this screenshot to hide/show the batch review summary.
Remember, there is NO warning or confirmation. Files will always be overwritten during batch review.
DOWNLOAD Scanned Image Extractor applicationDelete images during batch review
 You might have included some unwanted images in your batch process.
How to mark this image and all its splits for deletion? Simple, just right click the thumbnail and see the option in the popup menu. You can also undelete it in the same way.
You might have included some unwanted images in your batch process.
How to mark this image and all its splits for deletion? Simple, just right click the thumbnail and see the option in the popup menu. You can also undelete it in the same way.
Finishing batch review
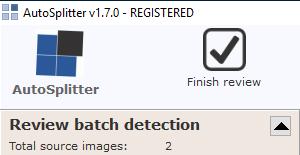 When you have reviewed all the results and saved all the changes, click "Finish review" button in the main menu area.
This will close the batch review panel and you will NOT be able to return to the review unless you start all over with the detection. Finishing the review will also physically
delete the unnecessary photos from the output folder. Unnecessary photos are the ones you deleted during review or marked for deletion.
When you have reviewed all the results and saved all the changes, click "Finish review" button in the main menu area.
This will close the batch review panel and you will NOT be able to return to the review unless you start all over with the detection. Finishing the review will also physically
delete the unnecessary photos from the output folder. Unnecessary photos are the ones you deleted during review or marked for deletion.
Resuming batch review
If you finish a review, you cannot return to it. On the other hand, restarting the program will preserve and resume the review session automatically. You can safely restart during batch review without losing data in the process.Return to the photo scanning guide hub page
Download AutoSplitter now!Website and software copyright by Zoltan Peter, Hungary, European Union 2013-2023
Some images copyright by doublejdesign.co.uk, visualpharm.com and led24.de Website hosted in Phoenix, USA.
Privacy statement
Website localization: English for global coverage (en), hosted by opalstack