 AutoSplitter


How to choose your scanning DPI? All about DPI settings.
Published: November 4, 2026
What is DPI?
Learn about DPI and scan smarter.
DPI stands for dots per inch and is a widely used measure of image resolution. It describes how many dots fit in a one-inch span. In image metadata, DPI records the resolution at which an image was scanned and helps determine how large it can be printed while preserving its original dimensions.
Scanners also use DPI to define scan resolution, or image quality. A higher DPI captures more detail and produces a higher-quality scan.
What does DPI affect?
Higher DPI improves image quality, but it comes at a cost. Higher DPI settings take longer to scan and create larger files, which require more storage space.
How long does it take to scan at different DPI settings?
I ran a quick experiment to record some measurements. I used a basic flatbed scanner and placed three 10 × 15 cm photos on the scanner bed.
I scanned them at various DPI settings to measure how long each scan took and see how the results related to one another. Would the relationship be linear or closer to exponential? Either seemed possible. Keep in mind that scan times vary by scanner; some models are faster than others.
I used my old Canon LiDE 110 flatbed scanner for these tests.
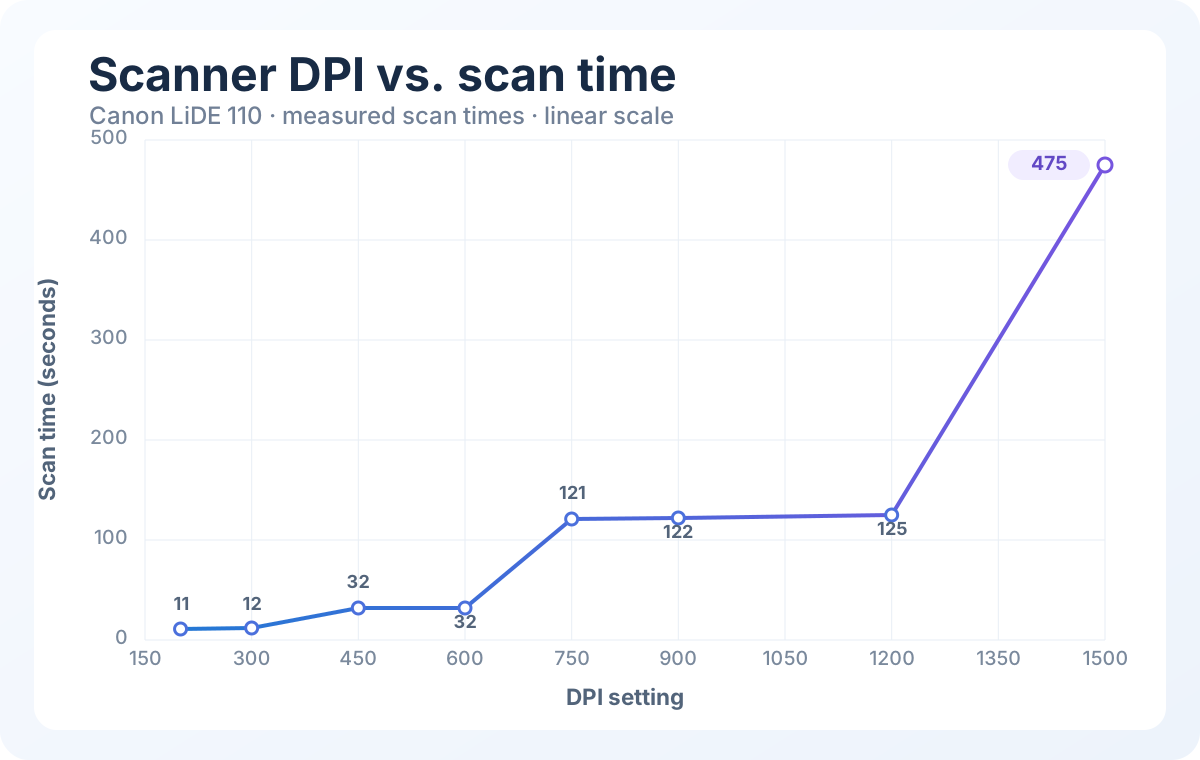
Doubling the DPI does not merely double the scan's pixel dimensions; it roughly quadruples the number of pixels. In my tests, scan times also rose in sharp steps. This behavior is probably scanner-specific, although many scanners may have similar performance jumps at certain DPI thresholds.
On my Canon, the breakpoints were just above 300, 600, and 1200 DPI. I didn't test higher resolutions because 1500 DPI already seemed excessive. Simply setting the scanner to 605 DPI increased scan time from about 30 seconds to about 120 seconds.
What is the ideal DPI to scan photos?
Your ideal setting depends on your priorities: how much time and storage space you have, and how much image quality you want. A scan at 600 DPI captures plenty of detail. On some scanners, 750 or 850 DPI may take about as long as 600 DPI; on others, crossing a resolution threshold can significantly increase scan time. If your scanner handles these settings efficiently, the 750–850 DPI range could offer a good balance between image quality and scan time.
The key takeaway is this: if you want high image quality without wasting too much time, find your scanner's DPI breakpoints. They are probably near multiples of 300. If you're happy with the scan time at 300 DPI, try 500 or 550 DPI for more detail.
Important note: Some scanners, including mine, do not support resolutions above 600 DPI through the WIA interface and only offer a few predefined DPI settings. For example, you may not be able to select 550 DPI. TWAIN interfaces are more flexible. If you can't select a TWAIN interface for your scanner in your photo scanning software, search the web for {your scanner name} TWAIN driver. Download and install the driver to access the more flexible TWAIN interface. Some older models may not explicitly support Windows 11, but that doesn't necessarily mean they won't work. I installed the Windows 10 driver on my Windows 11 system, and it works just fine. Choose your scanner's DPI and interface in AutoSplitter.
Does WIA scan faster than TWAIN?
The answer is simple: neither is faster. WIA and TWAIN are software interfaces that control the same scanner hardware, so scan speed should be roughly the same with either one.
What are the pixel dimensions of scans at different DPI settings?
There are two different things to consider: the pixel dimensions of a scan (the total pixel count grows roughly with the square of the DPI) and the size of the saved image files. File size depends heavily on how much of the scanner bed a photo occupies. A flatbed scanner can comfortably fit three or four standard photo prints at once, with each using about 10–15% of the scanning area. File size also depends on the format. JPEG files are smaller than TIFF files, but JPEG uses lossy compression and discards some image detail. The difference is usually hard to see, but if you want to preserve as much detail as possible, choose a lossless format such as TIFF. You can also save scans in both JPEG and TIFF, so you don't have to choose just one. Choose a photo output format in AutoSplitter.
The pixel dimensions of a scan may vary slightly by scanner manufacturer and bed size, but these figures should be a useful guide for most flatbed scanners.
| Scanning DPI | Image dimensions (pixels) |
|---|---|
| 200 | 1701 × 2338 |
| 300 | 2552 × 3508 |
| 450 | 3828 × 5262 |
| 600 | 5104 × 7016 |
| 750 | 6380 × 8882 |
| 900 | 7656 × 10524 |
| 1200 | 10208 × 14032 |
| 1500 | 12760 × 17540 |
Here are the file sizes of the photos I scanned:
| Scanning DPI | Photo file size | |
|---|---|---|
| JPEG | TIFF | |
| 200 | 140–190 KB | 1.2–1.9 MB |
| 300 | 300–440 KB | 3.0–4.3 MB |
| 450 | 540–830 KB | 5.5–8.3 MB |
| 600 | 970–1550 KB | 10–16 MB |
| 750 | 1180–2020 KB | 13–19 MB |
| 900 | 1630–2810 KB | 18–28 MB |
| 1200 | 2820–3340 KB | 33–51 MB |
| 1500 | 3660–6520 KB | 39–62 MB |
Estimate your photo collection size and scanning time
Now let's turn all this into practical estimates. Enter the number of photos you plan to scan, then select your preferred DPI setting and output format to see how much storage space and scanning time you may need. These are rough estimates: actual results depend on your photo sizes and your scanner's speed. You may spend just as much time on other tasks, such as preparing photos for scanning, fine-tuning, retouching, and colorizing them, adding captions, and saving the files. Scan time itself is unlikely to be a major concern unless you scan above 1200 DPI.
Photo archive size and scan time estimator
File sizes are based on the upper end of each measured range. Scan time is estimated in batches of up to three photos, matching the test setup.
Happy scanning! :)